How to Pixelate Any Video

Pixelate Your Videos using VideoPad Video Editor

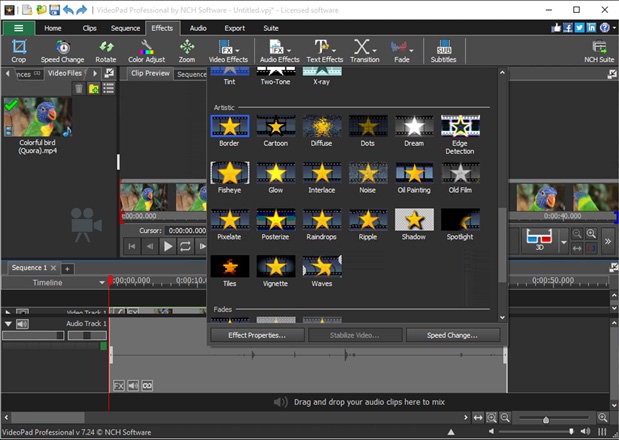
Whether you’re adding a mosaic effect to your projects or simply trying to censor your videos for a more suspenseful addition to your presentations, VideoPad allows pixelation of a video quickly and intuitively. Follow the steps below to successfully pixelate your videos using VideoPad Video Editor.


Download VideoPad Video Editor

Download Now

  1. Like many of our tutorials before, download and install VideoPad Video Editor and upload the video that you want pixelated. To add your file, click and drag the file onto VideoPad, or from the “Home” tab select “Add Files”

    Your video timeline will look similar to the one below: Add your video to the timeline.

  2. Select the portion of your video you would like pixelated. To do this, just trim the video to your desired length. We provide a detailed tutorial that will go over how to trim your video. You can find that tutorial here: https://www.nchsoftware.com/videopad/tutorial.html#trim
  3. After you have trimmed your video to your desired length, locate the Effects Tab. From this particular tab, select “Video Effects” and choose “Pixelate”. The Pixelate menu will be prompted.
    Select Video Effects and choose Pixelate.

  4. From this tool menu, you can choose the size of your pixel. The bigger the size the more distorted your video will be. Choose your pixel size by quickly dragging the cursor along your desired size or for a more precise option, choose the up and down arrows next to the pixel size number.
    Select Video Effects and choose Pixelate.

  5. The pixelation technique can be useful for multiple reasons. VideoPad Video Editor allows you to quickly add this feature to your videos in four simple steps.


Like what you see?

Download VideoPad here:

Download Now

Simply download and install VideoPad Video Editor to begin.

Download VideoPad